
Whittled wood can be used for many purposes. This article will focus on carving whittled wooden, but it also includes tips and tricks for making flowers, utensils, or balls for bird cages. Here are some suggestions for beginners. While softwoods are the easiest to whittle, you can graduate to harder woods if you're more advanced. A general rule is that wood with a straight grain will be easier to whittle than wood with lots of knots or multiple directions.
Carving whittled wood
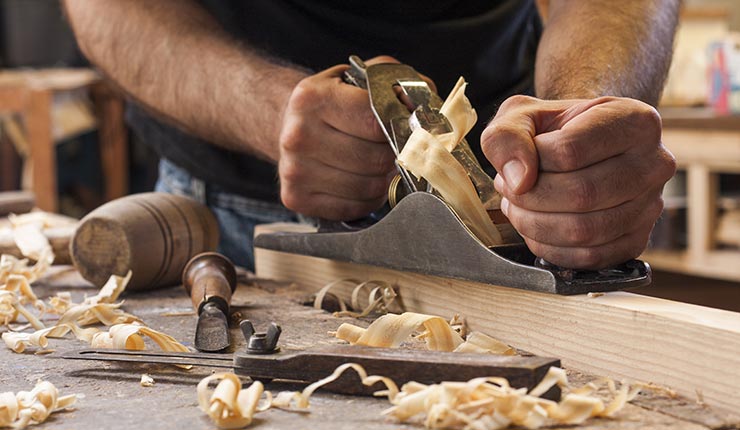
Whittling is one the easiest and most accessible methods of woodcarving. In fact, most people already own the tools needed to get started. Here are some tips for learning how to carve wood.
Whittling refers to a technique that creates beautiful shapes and cuts in wood. It involves removing bits from a larger piece of wood and leaving the surface texture. Some projects are fully smoothed out while others are sanded or scraped. In each case, the process involves removing the wood material and not clamping, gluing, nor joining.
Making whittled wood utensils
You can make interesting use of any pine you have left over. Tom made a spoon, fork and Japanese pull saw from leftover southern white pine from his wine rack. He used a fork and spoon shapes to be carved with a gouge. A coping saw, Japanese pull saw, and a knife were also useful. To finish the shape, he used a piece of sandpaper and an abrasive cloth.
For whittling, a pocketknife should be a standard tool. A crook or spoon knife is another essential tool. If you need to cut large chunks or pieces of wood, a cutting axe and folding saw are both useful tools. For finishing, you'll need food-grade oils. As the process can take several hours, make sure you have enough.
Whittled wood flowers
If you wish to carve a floral design from wood, you will need a sharp whittling or slicing knife. Keep your carving angle at 85 degrees when carving flowers. Cut your final cut at 90 degrees. This step can be repeated multiple times if you need a more complex flower. Finally, you can display your finished flowers on a stick. You can always try another version if your first flower is not perfect.
To give your flower a finished look, you can use beeswax or boiled linseed oil. To achieve a more precise finish, you can use a gouge. Use tools that could cause damage to the wood should be avoided. Safety comes first! You can use different colors of petals to make the flowers. Then glue a flower pin on the back. You're almost done!

In a cage make whittled timber balls
The ball-in cage is a classic trick toy. It is a loose ball that is cut to fit into a wooden frame. You can make one by simply measuring, marking, carving, and then smoothening the surface. A separate piece can be carved within the outer enclosure. This method can be used for a wide variety of woodworking projects including intricate jewelry and unique birdhouses.
Once the ball is done, it's time to shape it. A straight chisel is ideal for this process, as it provides greater control and makes it easier to cut along the end grain of the ball. You can then remove the cage bars to shape the ball. The final trimming is done once the ball has formed. The woodworking tools should be sharpened to prevent cuts from entering the hands. An optional pair of gloves can be very helpful, but it is not essential.
FAQ
What kind and type of wood should i use?
The most commonly used woods for woodworking are oak, maple, cherry. Each type of wood has its own unique characteristics that can affect the final product's appearance. Oak tends to be harder and darker than other woods. Birch is lightweight and soft while mahogany is heavier and denser. You can also choose from solid wood or veneers. Veneers are thin wood sheets that are glued together to form one layer.
How do I identify the type of wood that I am dealing with?
When purchasing wood, always check the label. It should have information about the wood species as well its moisture content and whether any preservatives were used.
Is it necessary to be a genius in woodworking to succeed?
No. It is not rocket science to woodwork. To create stunning works of art, anyone can learn to use basic power tools.
How can a novice woodworker make it big?
Many people learn how to make furniture in order to set up an online business. But if you're just getting started building furniture, there are other ways to earn money besides selling on Etsy. You can sell at local craft fairs. For those who want to build their own furniture, you might offer workshops. If you have experience as a carpenter or builder, you might consider offering services such as remodeling homes or creating custom pieces for clients.
Statistics
- In 2014, there were just over 237,000 jobs for all woodworkers, with other wood product manufacturing employing 23 percent; wood kitchen cabinets and countertop manufacturing employing 21 percent. (theartcareerproject.com)
- Woodworkers on the lower end of that spectrum, the bottom 10% to be exact, make roughly $24,000 a year, while the top 10% makes $108,000. (zippia.com)
- Overall employment of woodworkers is projected to grow 8 percent from 2020 to 2030, about as fast as the average for all occupations. (bls.gov)
- The U.S. Bureau of Labor Statistics (BLS) estimates that the number of jobs for woodworkers will decline by 4% between 2019 and 2029. (indeed.com)
External Links
How To
How to drive a nails in wood
When driving a nail into wood, it is important to first choose the correct size and kind of hammer. The most popular types of hammers include claw hammers as well as mallets and ball peenhammers. Each type of hammer has its pros and cons. A clawhammer works best when hitting something hard like nails. However, it can sometimes be difficult to see exactly where the strike is going. A sledgehammer is useful for striking large areas at once but too heavy to be effective for smaller tasks.
Once you have chosen the right hammer for you, put your hand flat against its side so that it rests comfortably in the palm of your hand. Hold the handle in your hand, but don’t force it too hard that you break. Your wrist should be relaxed while you hold the hammer straight upwards. Now, move the hammer towards the center of the nail by swinging it back. You should feel the impact on the nail from the hammer. If you're having trouble getting the hang of swinging a hammer, practice with a block of wood until you get the rhythm down.
Hold the hammer near your body until you're ready for the nail to be driven. The nail should be perpendicular to wood's surface. Keep your eyes on the tip. Swing the hammer forward, then follow through with the motion of the hammerhead. This can be repeated several times to increase the speed of your swing. When you are confident with the technique, add power to your swings. Then, raise the hammer from your shoulder to bring it down. This will help you put more energy behind each of your moves.
Once you've nailed the first hole, remove the hammer from the nail. To pull out the remaining nails, use a screwdriver or pry bar. Keep the nails heads in line with the surface of the board to prevent splitting the wood.