
It is important that you understand the differences in woodturners lathes before buying one. Learn more about Segmented Turning and Spindle Turning. Learn about the basic tools available. These will be helpful in making your first turn. You can produce stunning wooden products if your tools are right! It is important to learn how to properly use a lathe before you purchase one. Here are some tips.
Modern woodturners lathes
A lathe is an important tool in woodturning. A woodturning lat allows one to rotate a piece wood along a horizontal axis. The woodturning lathe allows an artist to shape, cut, grind, and sand the wood. There are endless possibilities for shapes and forms, and there's a lathe that will turn wood to your specifications.
While many people may think of a lathe as an essential tool, this is only the first part of the puzzle. Without the right tools, the lune is worthless. Effective tool sharpening is possible with the help of a grinder and jigs. Dust can easily get inside the woodturning machine, which is why many people give up early. Some people are even allergic to wood dust, so it's essential to wear a mask and respirator when working with a woodturning lathe.
Segmented turning
Segmented wood can be either a mixture of ring or stave constructions, or solid, unsegmented. Wood expands when it's moved in a straight line parallel to its grain. The wood moisture content will determine the extent of expansion. If a piece has a non-parallel direction, the turner should take this into consideration. If the grain directions of the wood are different from those of the other pieces, it can make it difficult to achieve the desired look.
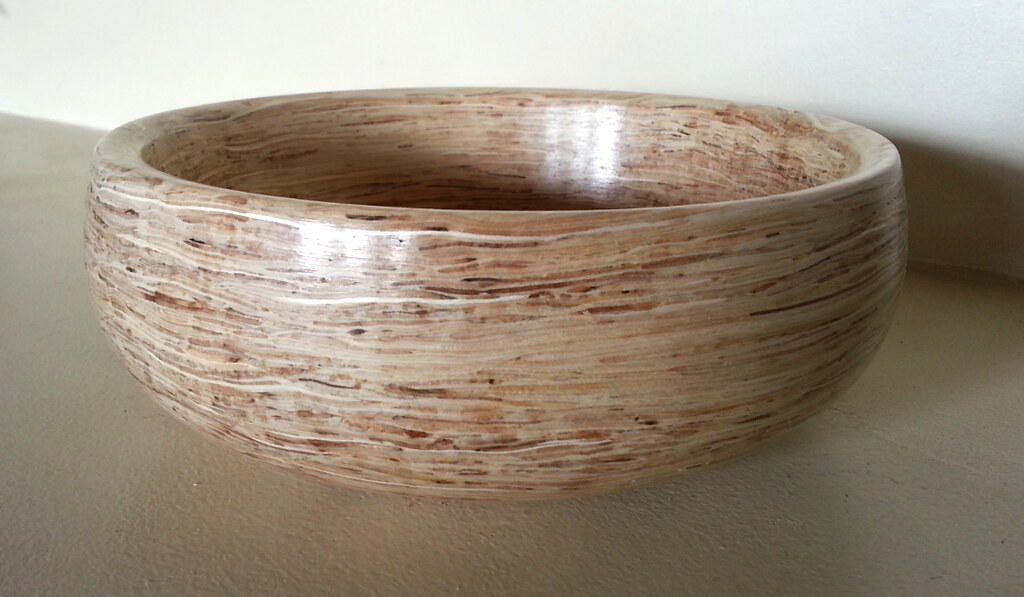
To make beautiful vessels, a good woodturning lathe will be a must-have piece of equipment. While working with wood, it is important to wear safety gear like eye and hearing protection. A video is also an excellent resource for safety guidelines. Many videos and woodturning projects have safety guidelines. Safety is of utmost importance when working in wood. So take the time and learn about them.
Spindle turning
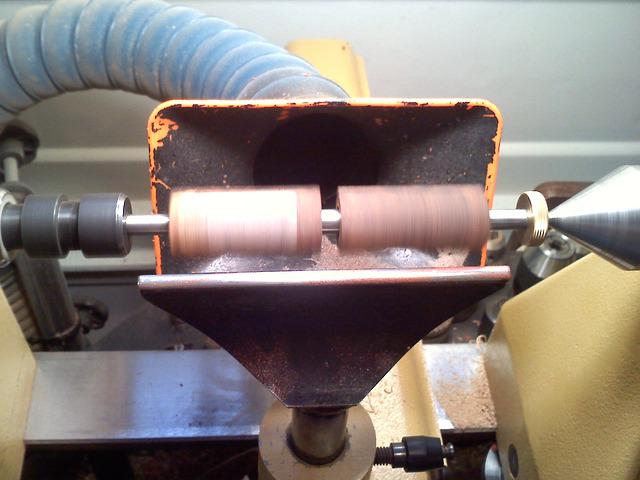
The woodturners lathe is a versatile tool that can be used for woodturning. A spindle has three modes of turning: skew; hand pressure; and steady rest. The spindle will become longer and more difficult to turn. The sound will be known as harmonic chatter. The sound will imprint a pattern of flat spots in the work, usually in a spiral pattern.
You have many options for mounting a spindle. There are two options for mounting a spindle: attach a faceplate to it or use a mechanicalchuck. The wood must be held between the tailstock's drive center and the tool. You can mount wood to make a bowl or other hollow vessel in any way you like, provided that it is between the rear spindle and the headstock. This process can take up to four hours and will yield a finished product with a diameter of a few inches.
Basic tools
A lathe can be a must-have for anyone interested in woodturning. This hobby uses wood to create beautiful pieces. These pieces are made by woodworkers who sand the wood using abrasives that they hold in their hands. These lathes can also be used with power tools like drills or right angle drills. After sanding, woodworkers finish their creations with coloring or texturing.
Square timber can be rounded with a skew-chisel. The stock should be touched first by the blade's bevel. A skew-chisel is used to do a variety jobs, including vee cutting (a process turners use prior to beading). These tools are also used for shaping spindles and faceplates. Use them only if the stock is above the centerline.
Safety equipment
There are several safety precautions to take while using a woodturners lathe. You should wear appropriate footwear and clothing to keep safe when working on a lathe. Use a woodturners shield to protect your face. Using the correct technique while lifting large pieces of wood can help reduce the risk of injury. Find a mentor in woodturning if you are just starting out. They can show you the correct technique and how to use safety equipment. In addition to watching a turner in action, read the user manual and read any warnings or instructions that are provided on the equipment.
Face shields protect you from flying objects by protecting your eyes and face. Even if shop glasses are worn, it is vital to have a face mask. A dust mask can protect against dust-related long-term exposure. You should also have high-quality turning smocks for when you are working. You'll need drill bits and sanding discs of high quality. To use your turning project, you will also need rare earth (RE), or tungsten caride.
FAQ
Does it take a genius to make woodworking work?
No. It is not rocket science to woodwork. Anyone can learn to use basic powertools and techniques to create beautiful work of art.
What is the difference in a hobbyist and professional woodworker?
Hobbyists enjoy making things out of wood, whereas professionals focus more on the quality of their work. Hobbyists take great pride in their creations, and share them with family and friends. Professionals will spend hours researching designs before they begin working on a project. Professionals will be meticulous about all aspects of their work, from selecting the right materials to finishing it.
How much money will I need to get started?
Each project is unique so there aren’t exact numbers. These are the factors that will give you an idea of how much you'll need.
-
Cost of materials
-
Tools and equipment
-
The time spent on the project
-
Your hourly rate
-
What amount of profit can you expect to make?
-
Whether you plan to hire help
Start small, if possible. You can make simple boxes or picture frames if you're just getting started. As you gain more experience, you will be able tackle more complicated projects.
How do I get started with woodworking?
It is best to actually build furniture to learn how to make it. While you will need tools and make mistakes, you will eventually master the art of building furniture.
You should first choose the project you wish to complete. It can be something as simple and small as a box, or large-scale as an entertainment center. Once you have chosen a project, locate a local woodworker who is skilled in this kind of work. Ask them for their advice about the tools and where they can be found. Maybe you can ask the person if they know of anyone who does this sort of work.
What is the difference between plywood and particle board?
Plywood is made of layers of wood that are pressed together under pressure. Plywood is available in a variety of thicknesses. It is often used to make cabinets or flooring. Particle board can be made from sawdust, resin, and then compressed to make large blocks. This board is commonly used in home improvement projects. Both types of boards can be easily cut and are durable.
How long does a piece take to finish?
It depends on the wood type you choose, the complexity and the amount you apply to the finished product. Hardwoods are more difficult to maintain than softwoods. Hardwoods tend to be more expensive that softwoods. They last longer and are more resistant to moisture. The typical time taken to finish a piece furniture takes anywhere from one to three month.
Statistics
- Woodworkers on the lower end of that spectrum, the bottom 10% to be exact, make roughly $24,000 a year, while the top 10% makes $108,000. (zippia.com)
- If your lumber isn't as dry as you would like when you purchase it (over 22% in Glen Huey's opinion…probably over 10-15% in my opinion), then it's a good idea to let it acclimate to your workshop for a couple of weeks. (woodandshop.com)
- Overall employment of woodworkers is projected to grow 8 percent from 2020 to 2030, about as fast as the average for all occupations. (bls.gov)
- In 2014, there were just over 237,000 jobs for all woodworkers, with other wood product manufacturing employing 23 percent; wood kitchen cabinets and countertop manufacturing employing 21 percent. (theartcareerproject.com)
External Links
How To
How to stain wood
Staining wood is the process of applying chemicals to the wood's exterior, which alters its color. This chemical reaction causes the wood to change from white to brownish red. Although oak is the most popular type of wood to stain, there are many other types that can be used.
There are many ways to stain wood surfaces. Some methods include mixing the stain along with a solvent like turpentine and then applying the mixture to the wood by brushing or spraying. Another method involves applying a solution of water to the wood. You can mix stains into varnishes or paints to make them part of your finish coat.
Preparing the wood surface is the first step to staining it. The wood must be thoroughly cleaned to remove all grease and dirt. Sanding smoothens scratches and rough spots. The next step is to determine the type of stain you would like to use. There are two types of stains that can be used: penetrating and non-penetrating. Penetrating colors penetrate deeper into wood than those that are non-penetrating. This makes them more suitable for darker colors, such as mahogany. Non-penetrating oils work best when used with light colors, like maple.
After choosing the type and application method you prefer, gather your tools. You can use a paintbrush to apply stains. This allows you spread the liquid evenly over the surface. A few rags are also handy to clean up any spillages after you have finished painting. If you intend to mix the stain yourself you will need enough containers to hold all the components.
After you have prepared your materials for staining, clean the area. To remove dirt and dust, use warm water and soap. Use a dampened sponge and warm water to clean the entire piece. You should remove any debris, especially if your plan is to stain darker wood.
Apply the stain. Next, apply the stain to the furniture by starting at one end. Move slowly and carefully along the grain of your wood until you reach its opposite end. The stain should not drip off of the wood's edge. Let the stain dry completely before proceeding with the next steps.
Apply a clear polyurethane sealant to protect the painted surface. Apply three coats with polyurethane. Allow the third coat to dry overnight, before sanding.