Scroll saw blades that are very narrow and fine should be used when cutting them. The package of a blade will usually state its size, material, and the required radius. A wider blade will not work for intricate patterns or curves that are small or very tight. To change the blade remove the throatplate from beneath the saw table. Before you can remove the throat plate, make sure to undo both the lower and upper blade clamp screws. You must follow the same instructions to change the blade as you did when installing it.
Free woodworking scrollsaw patterns
If you love animals, then you will love making deer out of wood. You can buy a deer design or make your very own with a scrollsaw. The deer pattern is available in all kinds of designs. Some deer patterns can be very complex, while others can be done easily by following simple linear patterns and practicing. The woodworking scroll saw deer patterns, which are free to download, are a great resource for learning the ropes of using your scroll saw.
Scroll saw patterns are online and available for advanced users as well as beginners. You can also find them in books and magazines. These patterns can be used for a variety items including a family sign. The family sign, which can be made with your scroll saw, is a wonderful woodworking project. It comes with a detailed wood description. A perpetual calendar can be used for more difficult projects. This manual calendar requires several pieces of wood and is adjustable daily. Magnet designs can be made of scrap wood.
You can also download a printable bear puzzle pattern. The pattern is available on several websites, including My Scroll Saw Projects and the Woodworkers Institute. Most of these patterns are designed for beginners, but you can also use them for more advanced projects. Many of the free scrollsaw patterns are meant for advanced and intermediate scrollers. These patterns can serve as a guide for new woodworking projects. They are also very easy for advanced users.
Easy to follow
This book contains 61 scroll saw deer patterns that are easy to follow, along with a bonus pattern for a deer frame. The patterns have been drawn using a precise, realistic technique. Each pattern is accompanied by detailed lines and brief cutting instructions. This makes it easy to cut them. There are many patterns in the book. They include a variety of deer species like the American buck, whitetail, and mule deer.

Many printable patterns are also available. Whitetail deer's free pattern includes a beautiful oval frame. The finished deer measures approximately eight by thirteen inches in width. These plans can be printed on paper and are fully-sized. If you're new to scroll sawing, the book includes an overview of the basic techniques for 3-dimensional scroll saw work. This simple pattern will allow you to get started in your carving journey.
You can find a book of scroll saw patterns that will help you to make a variety projects. These patterns can be used in many crafts and come in different wood species. The patterns also come apart, so you can use different colors of wood to create a variety of designs. Scroll saw patterns include full-color photographs as well as easy-to follow directions. You will also find useful information about scroll saw equipment and techniques in the book.
It's easy to cut
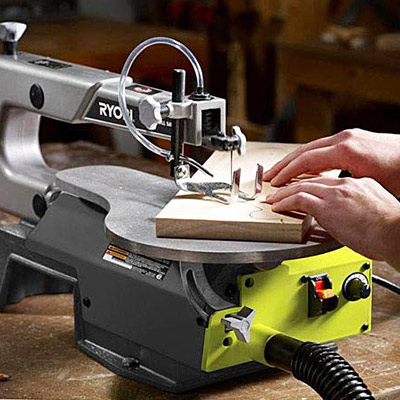
Scroll saws are a versatile tool that allows you to create intricate, detailed designs. You can create a beautiful buck or deer pattern using a scroll saw. Preparing the wood is the first thing to do. You will need to have some knowledge about woodworking in order to make a deer pattern. You will need to have a good guide to help you start cutting. A scroll saw air pump is easy to find at a local garage or pet store. A soft metal tube increases air flow velocity. To stop the blade slipping, a holddown is required. The hold-down should be strong enough to keep the wood from sliding off the table. It shouldn't interfere with the stock feed. Although a guard can be helpful, scroll sawyers often remove it once they've gained enough experience.

Scroll saw patterns come as a variety in sizes and shapes. Some are 2D; others are 3D. For beginners, you can start small and then build your skills. Scroll saw projects make a great introduction to the power saw. You can create stunning items for your home using the patterns above. These patterns come with step-by-step instructions. You can also watch a video to learn how to create a scroll saw pattern.
FAQ
How long does it take you to finish a piece?
It depends on the size and condition of the furniture. You can finish smaller projects, such as boxes or picture frames, in one day. Larger projects like dining tables and desks require several days. It takes time to properly stain and seal wood.
How often should I purchase new supplies?
You will likely need to replace some tools over time. Hand tools will need to be sharpened regularly. Power tools will require replacement parts every so often. Try spreading your purchases over a few months so you don't buy too many at once.
Is it possible to refinish your own furniture?
Yes! There are plenty of ways to refinish old pieces of furniture without having to pay a pro. Here are some suggestions:
Sandpaper can be used to remove stains and scratches. Finally, use a clean cloth or sponge to clean the surface.
Apply clear polyurethane varnish. Let dry completely before moving furniture around.
Acrylic paint is a great way to paint furniture.
You can stain the furniture instead of using paint. The furniture will have a rich look thanks to the stain.
Use shellac wax. You can protect your wood with wax and give it shine.
Statistics
- The best-paid 10 percent make $76,000, while the lowest-paid 10 percent make $34,000. (zippia.com)
- If your lumber isn't as dry as you would like when you purchase it (over 22% in Glen Huey's opinion…probably over 10-15% in my opinion), then it's a good idea to let it acclimate to your workshop for a couple of weeks. (woodandshop.com)
- In 2014, there were just over 237,000 jobs for all woodworkers, with other wood product manufacturing employing 23 percent; wood kitchen cabinets and countertop manufacturing employing 21 percent. (theartcareerproject.com)
- The U.S. Bureau of Labor Statistics (BLS) estimates that the number of jobs for woodworkers will decline by 4% between 2019 and 2029. (indeed.com)
External Links
How To
How to stain wood
Staining wood can be described as a process where chemicals are applied to the wood surface. This causes the wood to take on a new color. This chemical reaction causes wood to turn from whiteish to brownish. The most common type of wood used for staining is oak, although many other types of wood can be stained.
There are many methods to apply stain to wood surfaces. One method involves mixing the stain and a solvent and then spraying it on the wood. You can also apply a solution containing water and dye directly to the wooden surface. You can also mix stains with varnishes or paints so that they become part the finish coating.
Preparing the surface is the most important step in staining wooden surfaces. Clean the wood to get rid of any grease, dirt or other substances that might be detrimental to the stain's application. Sanding the wood smooths out rough spots and scratches. You must then decide on the type of stain that you wish to use. There are two main kinds of stains available: non-penetrating stains and penetrating. Penetrating stains penetrate deeper into the wood than non-penetrating ones, making them ideal for dark colors such as mahogany. Non-penetrating oils work best when used with light colors, like maple.
After deciding on the type of stain, you want to apply, prepare your tools. You can use a paintbrush to apply stains. This allows you spread the liquid evenly over the surface. After you're done painting, make sure to have some rags handy to remove any excess stain. If you intend to mix the stain yourself you will need enough containers to hold all the components.
After you have prepared your materials, clean the area you intend to stain. Use warm water and soap to clean away dirt and dust. Wipe the entire piece of furniture with a rag dampened with clean water. If you intend to stain darker wood, make sure you get rid of any debris.
Next, spray the stain. Next, apply the stain to the furniture by starting at one end. Work slowly and carefully, moving back and forth along the grain of the wood until you reach the opposite end. Be careful not to let the stain drip off the wood's edge. Allow the stain to dry completely before you move on to the next step.
A coat of clear polyurethane sealing agent is applied to protect the paint. Apply three coats polyurethane sealer. Allow the third coat to dry overnight before sanding the final coat.