Before you start applying a finish to your wood project, you should sand it as smooth as possible. You can use a variety of techniques to sand your wood. However, there is no single best way. This article will discuss various methods, including using a random-orbit sander, a belt sander, and a pumice stone. Below are some of the more common methods. You can read on to find out about each.
Use a random orbit sander
Random-orbit Sanders are superior to belt sanders for sanding wood because they offer a greater range of pressure and speed. A proper use will result in a smoother surface. These tools require you to be careful and constantly move them along the surface. In addition, improper use may result in harsh abrasions and make the smoothing job harder.

Using a belt sander
A belt sander is a great time-saver when sanding wood. One pass across an area will create successively smaller scratches. It is determined by the grit of the sandpaper. For example, coarse scratches with sixty-grit or eightygrit can be removed within minutes. Deep scratches can take several hours to sand.
A pumice stone is used
A pumice is a good choice when sanding hardwood. It is a natural rock that can be found in many grits. Although it can quickly remove scratches and dents on wood, it is not suitable for very fine finishes. Before you start sanding, be sure to soak the stone in water to keep it from becoming clogged.
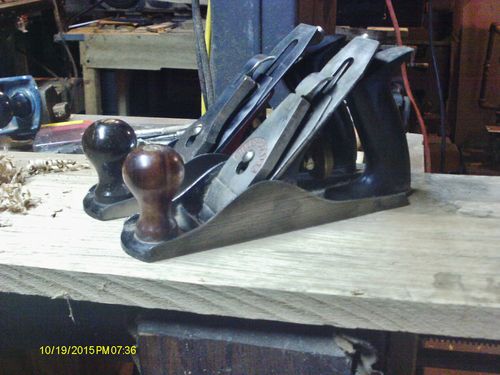
Use a hand plane
A hand planer can create a smooth surface in half the time that a belt sander takes. Its blades are continuous cuts in the wood. Planers don't require the same level concentration to achieve a smooth finish. Hand planes may not be as effective at removing bulk, and you will need experience to avoid tear out. Jack planes are an excellent choice for beginners. They can handle both bulk removal as well as smooth shavings.

Using steel wool
Use a steel sander to sand a small area. You don't want it to be too much and cause uneven results. To clean wood surfaces you can use mineral spirits. When the mineral spirits is applied to the cloth, it will change color and gradually brighten. If the steel wool starts to get dirty, you can easily change the cloth's surface and continue the process.
FAQ
Do I have to refinish my furniture?
Yes! There are many options for refinishing furniture that you don't need to hire a professional. Here are some examples:
Use sandpaper for removing stains and scratches. Use a clean cloth to wipe the surface.
Apply clear polyurethane finish. Allow furniture to dry completely before you move it around.
Use acrylic paint to paint furniture.
Stain can be used instead of paint. The furniture will get a rich look with the stain.
Shellac wax can be applied. The wax will add shine to the wood and protect it.
What else should I know about woodworking in general?
It is easy for people to overlook the work involved in furniture making. Finding the right kind of wood is the most difficult part. It is difficult to choose between the various types of wood.
A problem is that wood doesn't have the same properties. Woods can warp, split, or crack over time. These are important considerations to make before you purchase wood.
What kinds of woods are good for making furniture?
Woods are classified according to their hardness. Softwoods can be pine, fir or cedar. They're often used for outdoor furniture because they don't rot easily. The hardwoods include teak, maple, mahogany and oak. Because they are not weather-resistant, they are best used indoors.
Where can I find my woodworking tools?
There are many places you can get everything you need, and you don't have to go far. You could go to your local hardware shop or visit websites such as Amazon.com.
You can also search flea and garage sales for furniture and other materials that can be reused.
How can a beginner woodworker make money?
Many people learn how to make furniture in order to set up an online business. But if you're just getting started building furniture, there are other ways to earn money besides selling on Etsy. You can sell at local craft fairs. A workshop could also be offered for people who are interested to learn how they can build their own furniture. You might be able to offer services like remodeling homes or making custom pieces for clients if you are a skilled carpenter.
Statistics
- If your lumber isn't as dry as you would like when you purchase it (over 22% in Glen Huey's opinion…probably over 10-15% in my opinion), then it's a good idea to let it acclimate to your workshop for a couple of weeks. (woodandshop.com)
- Woodworkers on the lower end of that spectrum, the bottom 10% to be exact, make roughly $24,000 a year, while the top 10% makes $108,000. (zippia.com)
- Most woodworkers agree that lumber moisture needs to be under 10% for building furniture. (woodandshop.com)
- The best-paid 10 percent make $76,000, while the lowest-paid 10 percent make $34,000. (zippia.com)
External Links
How To
How to join two pieces of wood together without nails
Woodworking is a hobby that many people enjoy doing. Woodworking is a relaxing hobby that allows you to use your hands to create useful things from wood. You might want to join two pieces from the same wood, but you don't need to use nails. This article will demonstrate how to do so to preserve the beauty of your woodwork.
Before you can join the wood pieces together, you need to remove any rough edges. Sharp corners can cause problems down the line. Now it's time to start glueing your boards together.
If you are working with hardwood, only one side should be glue. Use glue on both the sides for softwoods, such as cedar or pine. Press the boards down until the glue is fully incorporated. Make sure you let the glue dry before moving on to the next step.
After you have glued the boards together, drill holes in the joints where you intend to place screws. These holes will differ depending on the type and size of screw you are using. For example, if your screw is a 1/2-inch wooden screw, drill a hole that is at minimum 3/4 inches deep.
Once you have drilled your holes you will need to drive the screws through each joint and into the backside. You should be careful not to touch the board's front surface. This could cause damage. Be careful not to drive the screws too hard at the ends. This will prevent the wood from splitting.
Once your project is complete, it's time to protect it against the elements. You have two options: seal the whole furniture piece or just the top. You will want to choose a product that will be durable for many years. Examples include oil-based varnishes and polyurethanes, shellac, lacquer and others.
You can find these products at most home improvement stores. Make sure you get the right product for your job. Keep in mind that certain finishes can be toxic and should not be used indoors. So, always wear protective gear when handling them.